
Martin's
GNU/Linux Projects
Media PC - one device and one remote for all media
Last modifications: 5 December 2022
- Introduction
- Why using a media PC?
- What it looks like
- Hardware setup
- Controlling a media PC
- How does LIRC work?
- LIRC configuration
- Applications without LIRC support
- Setting up LIRC
- Solving conflict with PCTV stick
- Multi-room audio player
- Hide the mouse pointer
- Tear-free video
Introduction
On this page I describe how I built my media PC. With this PC you can watch television, watch movies from DVD and hard disk, listen to music and view photo's. My media PC can be controlled with an infrared remote control.
All the information on this page is about a setup using:
- Linux Mint 20 with the Xfce desktop.
- Home-brew serial infrared receiver
- Linux Infrared Remote Control software (LIRC)
Do you also like to build your own remote controlled media PC? Read on and hopefully you will find some useful information here.
Some notes on LIRC
- LIRC stopped working from kernel version 4.12 (maybe earlier).
- From version 4.12, module lirc_serial is renamed to serial_ir.
- From version 4.17, LIRC should work again.
Why using a media PC?

Now that photo's, music and video (including television) are all available in digital format, you actually need only one device to have access to all this media: a computer!
Still, people try to sell us smart TV's, DVD and Blu-ray players, hard disk recorders and streaming media players. All these devices come with their own remote control and their own user interface. I do not like that. Furthermore, the use of these devices is restricted by the features built in by the manufacturer. I do not like that either!
So when I decided to replace my old bulky cathode ray tube television, it was clear to me I would not buy an expensive smart TV. Instead I bought a second hand computer and a HD LCD computer monitor to build my own ultra smart media PC!
What it looks like
Below you can see some screen shots of my media PC to give you an idea what it looks like. Click on an image to view a larger version.
My media PC desktop with media shortcuts (Xfce desktop environment):

Watching television with Kaffeine:

Listening to music using mpdevil, a simple client for Music Player Daemon, that is easy to control with a remote control (no LIRC support though):

Watching a DVD with VLC media player:

Enjoying pictures:

Switching between open application windows:

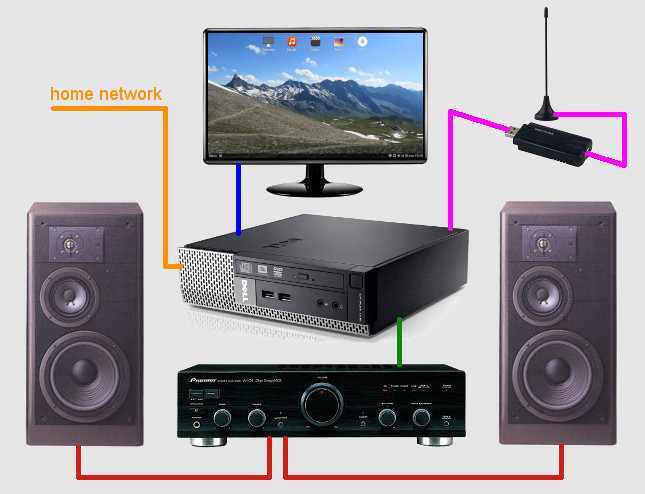
Hardware setup
Below you find a picture of my hardware setup. It consists of:
- PC with an Intel Core i5 processor
- HD LCD computer monitor (28 inch)
- Stereo amplifier
- Great sounding speakers (JBL LX44)
- DVB-T2 USB stick with antenna (DVB stands for Digital Video Broadcasting)
My infrared receiver and remote control are not shown in the picture below. They are described in the next section.
Some remarks:
- I use a Small Form Factor PC with a horizontal desktop case, that fits easily in my television cabinet.
- With the DVB-T2 USB stick and a small antenna, I receive 5 Dutch channels from the air for free in HD quality. That is enough TV for me. If you want more channels, use a DVB device for cable (DVB-C) or satellite (DVB-S).
- I really like my two JBL speakers so I chose for a stereo setup. But you can also make a surround sound setup, if you like.
- My media PC is connected to my home network so I can access all the media files on my NAS (and other computers). Surfing the Internet is also possible (of course!).
Controlling a media PC
To control my media PC I use a home made infrared receiver and a universal infrared remote control. The software I use is LIRC (Linux Infrared Remote Control). Read more about this software in the section How does LIRC work?
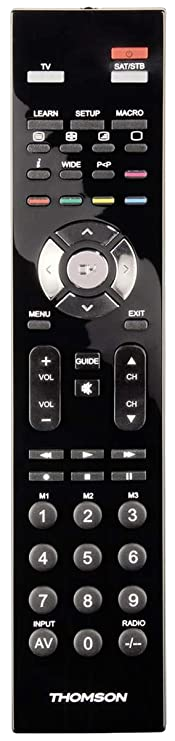
Remote control
You need quite a lot of commands to control a computer. So I chose a universal remote control with enough buttons to configure all the commands I like to use.
General commands:
- enter
- escape
- go up, down, left, right
- page up, down
- go one level up in file browser
- enter numbers 0-9 (to choose TV channel)
Desktop commands:
- show main menu
- show application menu
- show context menu
- show window menu
- show desktop (hide all windows)
- switch between application windows
- go to next, previous window (or window panel)
- close window
- show window in full screen mode
Media commands:
- play/pause
- stop
- fast forward or next
- rewind or previous
- record
- show TV program guide or DVD menu
- raise, lower volume
- mute sound
Infrared receiver
I have built the infrared receiver myself. It is cheap and fun to do (if you like soldering). To be able to use this home-brew receiver, you need a computer with a serial port. The receiver is very small and fits into a serial connector (see image). It works great with the LIRC software and my remote.
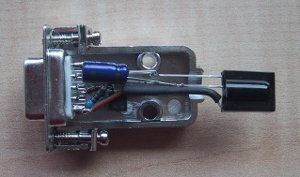
Read how to build your own serial receiver.
You can plug in the home-brew receiver directly into the serial port on the back of your computer. This will work well if the wall behind the computer is light enough to reflect the infrared signals from your remote. Otherwise you need an extra serial cable.
Choosing your remote & receiver
If you are planning to use LIRC, make sure your infrared receiver is supported. LIRC supports about 2500 remote controls, by use of configuration files (one configuration file for each remote). If there is no configuration file for your remote, you can create one your self.
See the section "Supported Hardware" on the LIRC homepage.
Mouse & keyboard
In stead of using a remote, you could also use a wireless mouse (and maybe a keyboard) to control your media PC. This will save the effort of configuring LIRC and making it work.
I hooked up a wired mouse and keyboard. I use them in case controlling with a remote becomes to cumbersome. For example, if I want to do a quick search on the web.

How does LIRC work?
Before actually setting up LIRC, first let's see how it works. In the picture on the right you can see the data flow between the hardware and software components of my LIRC setup.
When you push a button on your remote control, it sends out an infrared data signal. The infrared receiver receives this data signal and via the serial port and the serial_ir device driver the data is sent to the LIRC daemon lircd.
The LIRC daemon translates the "infrared data" into the name of the remote control button that was pushed. The translation (decoding) is defined in the configuration file lircd.conf. Each type of remote has its own lircd.conf file.
See my lircd.conf file to get an idea how a configuration file looks like.
Applications with LIRC support receive the name of the pushed button from lircd and a specific action is executed. For each button on your remote control you can configure an application and the action it has to execute. This is done in the .lircrc configuration file.
Take a look at my .lircrc file and see how applications and actions are assigned to remote control buttons.
LIRC configuration
As stated in the previous section, LIRC uses the configuration files lircd.conf and .lircrc.
Config file lircd.conf
The LIRC daemon lircd uses the lircd.conf configuration file to translate "infrared data" sent by your remote, into the names of the remote control buttons. On the LIRC website you can find configuration files for about 2500 different types of remote controls.
If your remote control is not in the list, you can create your own configuration file. You need the tool irrecord (part of LIRC) to do this. Typical usage (as a normal user):
$ irrecord -d /dev/lirc0 [-u <config-file>]
The tool irrecord will ask you to push buttons on your remote and will also ask you to enter the names of the buttons. This whole procedure will take some time! The output is written to a file in the current directory (look for *.lircd.conf or irrecord-tmp-*). Use the -u option to update a previously created configuration file.
Read more about irrecord on the LIRC website.
Config file .lircrc
Applications with LIRC support use the .lircrc configuration file to see what action has to be taken when a certain remote button is pushed. Below you find some examples. A more detailed explanation about the .lircrc file format can be found on the LIRC website.
.lircrc example (1)
Pause a video in VLC media player with the pause button on your remote:
   begin
     button = KEY_PAUSE
     prog = vlc
     config = key-pause
   end
A special application is the LIRC tool irexec. It is used to execute other applications.
.lircrc example (2)
Start Kaffeine media player using the radio button:
   begin
     button = KEY_RADIO
     prog = irexec
     config = kaffeine &
   end
I mainly use irexec in combination with xte to generate fake keyboard strokes. For example, if you want to close a window using your keyboard, you press Alt+F4. To close a window with a button on your remote, you can use irexec and xte to fake the Alt+F4 keyboard strokes.
.lircrc example (3)
Close a focused window with the power button, using xte:
   begin
     button = KEY_POWER
     prog = irexec
     config = xte 'keydown Alt_L' 'key F4' 'keyup Alt_L'
   end
You can also use the LIRC tool irxevent to generate fake keyboard presses. But I find this tool more complicated than xte and it does not offer extra features that I need.
Applications without LIRC support
VLC is the only application I use that has built-in LIRC support. For the other applications I made scripts that are called from the file .lircrc.
Example: LIRC script for Kaffeine
#!/bin/bash

# usage:  lirc-kaffeine.sh <action>
# action: record | menu | guide | full

# Get window process ID of active window
pid=$(xdotool getactivewindow getwindowpid)

# Check if kaffeine is running in active window
if [[ "$(ps $pid)" == *kaffeine* ]]
then
  case $1 in
    record)
      xte 'key r'
      ;;
    menu)
      xte 'keydown Alt_L' 'key b' 'keyup Alt_L'
      ;;
    guide)
      xte 'key g'
      ;;
    full)
      xte 'key f'
      ;;
  esac
fi
Below you can see how to call this script from the file .lircrc.
.lircrc example (4)
Record a TV program in Kaffeine with the record button on your remote.
begin
  button = KEY_RECORD
  prog = irexec
  config = /home/martin/lirc-kaffeine.sh record
end
Setting up LIRC
The default so called unit file that systemd uses to start the LIRC daemon, /lib/systemd/system/lircd.service, does not work for my setup. Therefore I made my own startup script and I changed the systemd unit file so it calls this startup script (see How to set up LIRC).
Startup script LIRC daemon
#!/bin/bash

# Startup script for LIRC daemon with home-brew serial port IR receiver

# Create directory /var/run/lirc/ (needed by lircd)
# This directory may already exist (but sometimes not)
mkdir /var/run/lirc/

# Free serial port
setserial /dev/ttyS0 uart none

# Load serial_ir module (driver for IR receiver)
# This will create device /dev/lirc0
modprobe serial_ir

# Start LIRC daemon
/usr/sbin/lircd --device=/dev/lirc0 --driver=default /path/to/my/lircd.conf
Finally a summary how to install, configure and start LIRC.
How to set up LIRC
- Use your package manager to install the packages setserial and lirc.
- If you want to use xte, install the package xautomation. If you prefer irxevent, install the package lirc-x.
- Create a .lircrc file and place it in your home directory.
- Find the right lircd.conf file for your remote control in the LIRC remote database and place it anywhere you want. If you can not find a configuration file for your remote, use irrecord to create one.
- Create the startlirc.sh script and place it anywhere you want. Edit the path to lircd.conf in this script.
- Edit the unit file that systemd uses to start the LIRC daemon: /lib/systemd/system/lircd.service. Only change the following section:
[Service]
Type=forking
ExecStart=/path/to/startlirc.sh
Solving conflict with PCTV stick
The TV USB stick I use - PCTV Systems tripleStick T2 (292e) - has a built-in IR receiver. I discovered that my home-brew IR receiver does not work whenever the driver for the PCTV stick is loaded first, i.e. before the driver of the home-brew receiver is loaded. Which driver is loaded first, differs per boot, so sometimes my home-brew receiver works and sometimes is does not.
How to show loaded IR drivers
Install ir-keytable from your package manager and execute the following command in a terminal:
$ ir-keytable
The output looks like this:
Found /sys/class/rc/rc1/ with: Name: PCTV tripleStick (292e) Driver: em28xx Default keymap: rc-pinnacle-pctv-hd Input device: /dev/input/event14 LIRC device: /dev/lirc1 Attached BPF protocols: Toegang geweigerd Supported kernel protocols: rc-5 nec rc-6 Enabled kernel protocols: rc-5 Extra capabilities:Found /sys/class/rc/rc0/ with: Name: Serial IR type home-brew Driver: serial_ir Default keymap: rc-rc6-mce Input device: /dev/input/event13 LIRC device: /dev/lirc0 Attached BPF protocols: Toegang geweigerd Supported kernel protocols: lirc rc-5 rc-5-sz jvc sony nec sanyo mce_kbd rc-6 sharp xmp imon rc-mm Enabled kernel protocols: lirc Extra capabilities:
The following solution worked for me but it might work for other conflicting drivers as well.
How to solve the conflict with PCTV stick
- Blacklist the em28xx driver so it will not be automatically loaded on boot. To do this add the following line to the file /etc/modprobe.d/blacklist.conf:
blacklist em28xx
- The em28xx driver must be loaded after the driver of the home-brew receiver has been loaded. You can accomplish this by adding the following lines to the end of the LIRC daemon startup script:
sleep 20
modprobe em28xx
- Reboot your computer.
The sleep command prevents that the em28xx driver is loaded too early (with no TV reception as a result). Maybe not a very pretty solution, but it works!
Multi-room audio player
On my Media PC I listen to music that is streamed from my NAS. Other computers play the same music in sync. A multi-room audio system makes this possible.
Read more about my other project: Multi-room audio player.
Hide the mouse pointer
On a remote controlled PC you do not need a mouse pointer.
Unclutter is a utility that hides the mouse pointer after a period of inactivity. Install unclutter with your package manager.
Tear-free video
If you experience video tearing, you can try another window manager and compositor. In Mint Xfce this is easy.
How to choose another window manager and compositor in Mint Xfce
- Choose Settings from the main menu.
- Choose Desktop Settings.
- Choose a window manager and compositor.
- Click OK to save your choice.
In older versions of Mint Xfce, Desktop Settings is not available. Also other desktops may not have the possibility to change the window manager and compositor that easy. But there is another way to stop video tearing: set up the compositor Compton.
How to set up Compton for tear-free video
- Use your package manager to install the package compton.
- Make sure that no other compositor is running (in Xfce use Window Manager Tweaks to disable compositing).
- Start Compton as follows:
$ compton --backend glx --paint-on-overlay \
          --glx-no-stencil --vsync opengl-swc -b
Call this command using the autostart feature of your desktop.