
Martin's
GNU/Linux Projects
Srsync - a script using rsync
Last modifications: 29 April 2025
- About srsync
- Installation
- Configuration
- Usage
- Rsync options
- Rsync and different file systems
- Remote login without password
- GNU General Public License
About srsync
Why srsync?
Rsync is a great and powerful tool for synchronizing directories. But you easily make mistakes when typing the (long) arguments (if you can remember them at all!). I tried some GUI's that use rsync, but I did not like the way they worked. Not being a GUI programmer, I wrote the script srsync to make using rsync easier.
What is srsync?
Srsync is a bash script. You run it from the command line.
The idea behind the script is simple: put those "difficult" rsync arguments in a configuration file (just another script, actually) and present the user with simple text menus. In the configuration file you can configure multiple sync sessions. During a sync session two directories are synchronized (this is done by rsync).
To give you an idea, the main menu looks like this:

See Usage for an explanation of the menus.
Installation
1. Install the script srsync
Installation of srsync is done in 3 steps:
- Download the tar archive containing srsync.
- Unpack the tar archive and place all files in one directory.
- Make sure this directory is in your path.
It is convenient to use /home/<user>/bin because this directory is already in your path by default.
2. Install the program rsync
You need to install rsync on the local computer where you run the script. Also install rsync on any remote GNU/Linux computer to synchronize to. See the rsync website for more information about rsync.
Configuration
Below you find an example of the configuration file 'srsync.config' with an explanation on how to configure multiple sync sessions.
#!/bin/bash

# Configuration file for srsync

# This configuration file is a bash script.
# It is used to assign values to the variables mentioned below.
# For example: count=3, name[$i]="Music Sync".
# Do not use spaces around the = sign. Use quotes around strings.
# And do not remove the # sign from the comments!

# In this file you can configure multiple sync sessions
# (during a sync session two directories are synchronized).

# count     Number of sync sessions
#           Only sync sessions one till count are shown in the main menu
# i         Sync session number
# name[$i]  Name of the sync session
#           This name is shown in the main menu
# ldir[$i]  Source or local directory (must end with "/")
# rdir[$i]  Destination or remote directory (must end with "/")
# args[$i]  Rsync options
#           For example: "-av", "-av --delete" or "-rtv"


count=3

# sync session 1
i=1
name[$i]="Data Backup"
ldir[$i]="/home/user/Data/"
rdir[$i]="pc2:/home/user/Backup/Data/"
args[$i]="-avh --delete"

# sync session 2
i=2
name[$i]="Music Sync"
ldir[$i]="/home/user/Music/"
rdir[$i]="user@pc2:/home/user/Music/"
args[$i]="-avh --delete"

# sync session 3
i=3
name[$i]="Mp3 Player Sync"
ldir[$i]="/home/user/Music/"
rdir[$i]="/media/Player/Music/"
args[$i]="-rtvh --modify-window=1 --delete"
Usage
Starting srsync
Run srsync from a command prompt as follows:
$ srsync [OPTION [SESSION]]
Explanation:
no OPTION    show main menu
-s SESSION   show session menu
-x SESSION   execute session (synchronize directly)
-h           show help
-v           show version and copyright info

with SESSION = session number in config file
Srsync with the -x option, does not require further user action and may therefore be used for scheduling (for example with cron).
Main menu
Start srsync with no option, to get the main menu.
Tip: To start srsync with a mouse click, make a launcher/starter on your desktop.
From the main menu above you can choose which sync session you want to execute. If you choose a session (enter the session number), the session menu appears.
Session menu
Below the session menu for session 1: "Data Backup".
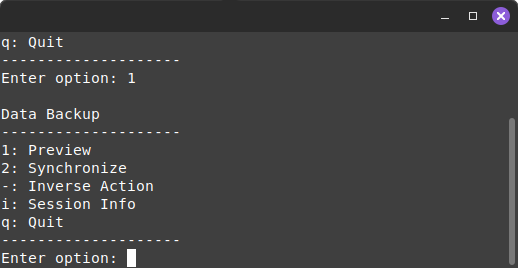
You can choose different actions for a session:
1: Preview        Only show what will be done during synchronization
2: Synchronize    Synchronize source and destination
i: Session Info   Show session info as configured in config file
q: Quit           Exit menu (in this example you return to the main menu)
Exit codes
Srsync exits with one of the following exit codes:
| 0 | No error or user quits srsync from menu |
| 1 | Error reading configuration file |
| 2 | Wrong argument |
| 3 | Error in configuration file |
| 4 | Rsync error (this exit code can only occur with the -x option) |
When the user quits srsync from a menu, the exit code will always be 0.
Rsync options
In the configuration file you can specify rsync options, using the variable args[$i].
Options not to use in the config file
The rsync options below are used by srsync already where appropriate. So do not use them in the configuration file.
-n, --dry-run            perform a trial run with no changes made
    --progress           show progress during transfer
The option -n is used if you choose Preview from the session menu. If you choose Synchronize from the session menu, the option --progress is used.
Often used rsync options
Below a list of rsync options you might want to use.
-a, --archive            archive mode
                         equals -rtlpgoD (no -H,-A,-X)

-r, --recursive          recurse into directories
-t, --times              preserve modification times
                         (only update changed files)
-l, --links              copy symlinks as symlinks
-p, --perms              preserve permissions
-g, --group              preserve group
-o, --owner              preserve owner (super-user only)
-D                       same as --devices --specials
    --devices            preserve device files (super-user only)
    --specials           preserve special files

    --delete             delete extraneous files from dest dirs
-v, --verbose            increase verbosity (more info)
-h, --human-readable     output numbers in a human-readable format
    --modify-window=NUM  compare mod-times with reduced accuracy
Rsync and different file systems
Ext FS
If the destination and source directories are on ext file systems, you may use for example the following rsync options:
-a (same as: -rtlpgoD)
-a --delete
-avh --delete
NTFS
On NTFS the options -l -p -g -o, -D (and therefore also -a) are not supported. If the destination or source directory is on NTFS, use -rt in stead of the option -a. For example:
-rt
-rt --delete
-rtvh --delete
FAT FS
USB sticks and media players often use the FAT file system. If you want to synchronize a FAT stick or player, you need to use a special rsync option.
On a FAT file system, just like NTFS, the -a option is not supported. Furthermore the time stamp on a FAT file system is inaccurate. This means that during synchronization, all files (unchanged files too) are updated, even with the -t option. To avoid this, use the special option --modify-window=1:
-rt --modify-window=1
-rt --delete --modify-window=1
-rtvh --delete --modify-window=1
Note: When syncing to my MP3 player, sometimes unchanged files are updated, even with the -t option and --modify-window=1. I discovered a time stamp mismatch (between the files on my computer and the files on my player) of exactly one hour or one hour and one second (something to do with summer and winter time?). To prevent unchanged files from being updated, I changed --modify-window=1 to --modify-window=3601.
Remote login without password
Each time you synchronize to a remote computer, you will have to enter a user name and password for that remote computer. If you do not like that, you can automatize the remote login.
Say you run srsync as user andy on computer alfa and you want to synchronize to computer beta as user bernie. You will need an automatic login from computer alfa as user andy to computer beta as user bernie.
- First log in on computer alfa as user andy and generate a pair of authentication keys (a public key and a private key):
andy@alfa:~$ ssh-keygen -t rsa
Use the default name id_rsa for the file in which to save the private key (just hit enter) and do not use a passphrase (hit enter twice). - Now use ssh to create a directory /home/bernie/.ssh on computer beta as user bernie (the directory may already exist, which is fine):
ssh bernie@beta mkdir .ssh
You will have to enter bernie@beta's password. - Finally append user andy's new public key to the file /home/bernie/.ssh/authorized_keys on computer beta as user bernie:
cat .ssh/id_rsa.pub | ssh bernie@beta 'cat >> .ssh/authorized_keys'
You will have to enter bernie@beta's password again. - Check if you can log into computer beta as user bernie from computer alfa as user andy without password:
ssh bernie@beta
GNU General Public License

Srsync is free software. This means that everyone may use, copy and modify srsync and may distribute modified versions. Srsync is published under the GNU General Public License. This ensures that the script remains free.
More information about free software and the GNU General Public License can be found on the website of the Free Software Foundation.